Tuesday 30 October 2012

DIY: Indoor/ outdoor A-frame play tent.


Last summer whilst on a trip at my folks in lovely Devon, I discovered this blog post: A-frame tent and I was absolutely smitten, I had to make this pronto. I looked over to my dad, asked him if he had any 2x1"ish batons, he did, so I told him to get his drill out and off we started, that soon. It wasn't quite that quick to make in total as I needed to gather supplies but all in all I think the two of us finished the whole tent over two morning nap times. My dad cut and drilled the posts and I sewed the fabric and sanded the wood.
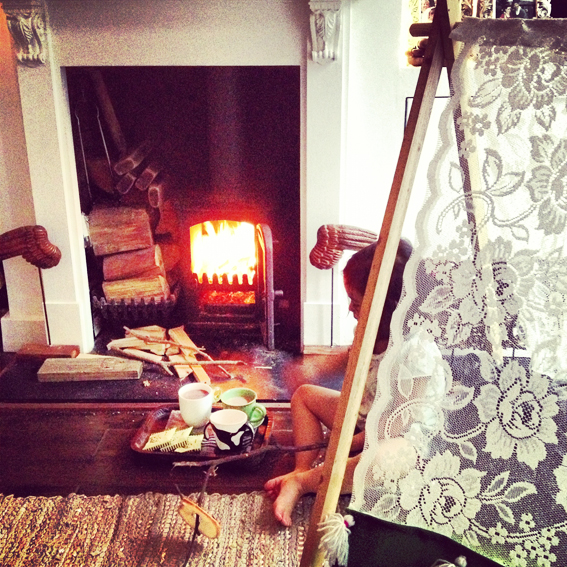
For Kwak Palace this tent is ideal, the frame is light and easy to erect/ dismantle and it stores perfectly under the little ladies bed. I did look for the vintage sheet/ crochet blanket combo but the devon charity shops did not prove lucky that day, so I bought lengths of net curtain and green fabric instead. I have since been informed the green fabric is in fact the fabric used to cover snooker tables. I went with green as there is a lot of green in my house, I do like green, snot green a particular favourite, so it is versatile in all rooms really, if the tent fits that is.
I added the red figure of 8 loops to provide a little more support on our wooden floors and I got carried away one day and made a load of wool tassel's to funk it up.

Strike a pose:
The little lady enjoying her tent in the summer, perfect for picnics in the garden with her dollies.

Tassel detail:


My sewing machine technique can only be described as 'wonky', but I am learning.

Casually hanging about:

Perfect for the bedroom, she uses it as a den to play in and also to occasionally sleep in at night.

I can see you:


The transparency is what instantly appealed to me, as if she chooses to sleep in it, I can easily see she is OK, when I pop my head in the door at night. (She is actually asleep in it right now as I type).

Living room:

And as you have seen previously, it was the main act for a spot of autumn glamping fun.


Cost: The batons were free c/o my dad, as was the sewing machine and cotton. Net curtain £2.00, 3x broom handles: 89p each, green fabric £4 per metre, I bought 70cm. Total: £7.47. I already owned all supplies for the tassel's and loops.
Supplies: 2x 2x1" batons, net curtain, snooker table fabric, sewing machine with white cotton, scissors, pen, drill, saw and sand paper. Figure 8 loops: webbing and cotton thread, Tassel's: wool and embroidery thread.
Time taken: 2x morning nap times= 4 hours, not including shopping for supplies.

So have you seen abeautifulmess.com? if not do look. It is one of the first blogs I discovered, and the very first where I had to sit and look through every single post from present to the beginning, it took me days but was well worth it, these girls are amazing. The only downside is they have an absolutely amazing collection of Lotta clogs which I am super green eyed jealous about.

Illustration: Cheerio goodbye card.


This card was created purely as I had doodled the spoon and was quite happy with it, I should probably create a better story but that is the truth. It has since been used for people leaving jobs, leaving London and leaving the UK. What a multipurpose cheerio.
Incidentally it always makes me sing 'Bonsoir old thing cheerio chin chin, naffoo toodleloo good byeee'. I have no idea what that song is from, any ideas?


Artwork copyright of Queen Kwak.

Royal Play: Indoor glamping fun.


Snotty nose season has begun. It was mighty chilly here in London over the weekend and what better to do in sub zero temperatures? go camping obviously, at least according to the little lady. We are no fools, and we were not leaving the house so instead we did ourselves a bit of glamping (glam camping) in the living room, and very lovely it was too.

The essentials:


One tent with lots of blankets and cushions? tick.

Toasty:


Log fire? tick. Hot chocolate? tick. Biscuits? tick. Toast and butter? tick tick tick.

Adult supervision:

The highlight, making toast together on the fire.

Glamping feast:

Glamping fun:

So do you have any recommendations for family fun ideas on chilly, snotty nosed days?

Monday 29 October 2012

DIY Tutorial: Felt flag nursery bunting.


So I needed to cram some step by step tutorial making/ photography practise in and what better to work on, oh yes the ever popular bunting. Obviously I am setting my aims high here, but please bear with me, as whilst it may be simple/ obvious stuff, at least the colours I have chosen make for pretty pictures, so that is something to look forward to, everyone likes a rainbow. Plus it is made of felt and requires the most basic of sewing skills. Win win.

Step by step:

1. Draw and cut a flag template from card and 2. Collect together all supplies.


3. Draw around your template three times per colour, keeping each flag side by side to minimise waste, then 4. Cut out. Repeat this with all colours. You can add/ minus the amount of flags depending on the length you are making, I used 18 flags to 1.5m string.


5. After cutting the flags from all colours you are now ready to start. Cut your string, at the required length and 6. Start stitching through each flag. I tied a knot before the first flag, and each flag has four front stitches. I left a 3cm-ish gap between each flag and stuck to the rainbow colour sequence.


7. Tie a knot after the last stitch in the last flag, and by golly I think we are done. It is so light, this set have been hung with washi tape.

Casually hanging about:
And no that is not damp on the wall, it is a combination of the light and photography.

Buzz loves a bit of rainbow bunting:


Cost: Free as all previously owned, but for reference the felt was originally bought in squares at 30p each and the string was £1 from Tiger. Three flags used less than half a felt square.
Supplies: Felt in various colours, string, card, pen, scissors and embroidery needle.
Time taken: 1 hour, or half a baby nap time.

So hit me with it, any tips or advice on my tutorial technique would be welcome, but please try to be kind, I do promise to be a bit more creative next time. Also I am curious how many tutorials I will need to make before I get the new kids step by step song out of my head? New kids are King Kwak's favourite band by the way, but shhh I did not tell you that.

Royal Feasts: Bento lunch epiphany.


Last week I had an epiphany, a proper angel chorusing 'hallelujah', life altering, seeing the light moment... I discovered bento lunches, all thanks to this blog: www.meetthedubiens.com. This lady is a genius, seriously, she is AMAZING and I knew from there on, that fine dining at Kwak palace will forever be changed... They will be funky as, fact. It took every single possible ounce of my will power not to immediately buy every single bento creating gadget available, I was a very strong lady that day.
The following pictures depict our week of bento lunches. I am not sure if bento lunch is really the correct term, as I imagine that is more appropriate to the lunch box food, but as I do not know a proper term for this, that is what I shall call it. The pictures show what I served the little lady, aged 3. The little chap had similar but chopped up and pieced back together, not quite so pretty on the photo front I'm afraid.

Row row row the boat:
Photo above. A cheese and ham sandwich with tomato portholes, ham sail and cheese flag. spinach spaghetti waves with carrot and cheese fish and frankfurter octopus. Covers most food groups I feel.

Curly whirly:

Poor effort I know. Cream cheese and chopped spinach pasta hair, broccoli and cauliflower hair bow, egg eyes and chicken ears and mouth.

Medusa pizza:


Whilst I am normally quite modest, I do feel this was my piece de resistance. Tomato and ham homemade pizza with cucumber fangs and eyes, caper eyeballs, red pepper mouth and eyebrows, olive oil and broccoli spaghetti hair with broccoli snakes. We were getting into the halloween spirit, she even wore a witches costume to eat it.

Beetle blood soup:


A bit of a failure, you can't win them all, but seriously have you ever tried to carve beetles out of frankfurters? its hard. Tomato soup, grated cheese, toast spider and frankfurter beetles that look nothing like beetles. I rushed.

Teddybears picnic:

Tomato and cheese home made pizza bear head with ham, cheese and caper features, cabbage smile and broccoli trees.

After serving the bear masterpiece, yes I was quite proud of that one, my little lady, aged three, sat me down, patted me on the knee and said 'mummy, please stop making scary food, please make normal food'. 

A. bullet. in. my heart.

So that is the end of that. Sob. But it won't be, I will just let my bento making dream lay low for a week or two, then it will be back, super friendly scenes a plenty, she will see.
After the initial devastation of 'our chat', I did realise she had endured 5 days of it, 5 days of me sat right next to her applauding myself whilst she ate. Also I could only come up with bread based ideas, and neither of my babies particularly like bread (nightmare) and I very, very rarely ever gave her pizza before, and frankfurters never, so I can see her point. Slightly. but like I said, I am not crushed, my bento dreams will return.


Royal Play: DIY masking tape Hopscotch.


Rainy days, what to do in the skinniest house in London? why hopscotch of course, and yes I was getting a little desperate. All you need is one floor: comes standard with most properties, one roll of masking tape: doesn't everyone have a roll stashed somewhere? and a throwing object, something soft preferable. Place the tape on the floor like so and that is it, plus it kept the babies entertained for absolutely ages. 3 weeks it was down in fact, slightly lazy and a little bit manky on my part, it then took 2 further weeks for my little lady to notice it had gone, at which she cried. Seriously, 2 weeks.

Disclaimer: As I used masking tape, it was low tack and did not cause any damage to the floor. We have real wood flooring, I am not sure if it would be any different on other materials.

Note to self: Next time DO NOT pick the narrowest part of the kitchen for this,  go crazy do it in another room.

Supplies:

Plan view:


Action shot:


Even more action:


Cost: Zero pennies, yippee.
Supplies: Masking tape, floor and SOFT throwing object. Witches outfit optional.
Time taken: 10 minutes and lasted 3 weeks.

Have you come up with any fun activities out of sheer desperation? Please send me your ideas, please, please, please do, winter is coming and the rainy days will be plenty.

Royal Attire: Urban ballerina.


This new feature will pay homage to websites such as WIWT, You know the deal, blogs where people post their daily outfits and style tips. I do find myself visiting such sites on occasion, but mine will not be myself in my gear. That would not be very interesting for you, no. Instead I will post the outfits my little lady chooses for herself. Hoorah. If we are staying in I let her have complete free reign over her wardrobe, and choose whatever she so wishes to wear, I would not let her go out in public in it (King Kwak does, the shame) but I, if no one else, finds it really rather amusing, so from here on I will post the princess Kwak's daily fashion fixes, your in for a treat. And so your know, one section of her royal wardrobe houses her fancy dress box, this will feature highly.

Outfit synopsis:
Style: Urban ballerina.

Ballerina leotard (not ballet day)
Gap silver gillet (not going out)
Ballet wrap (just seen), knitted by my mum
M&S leopard print boots
H&M hello kitty sunglasses (not sunny)
Poundland jewellery
Claire's headband

Feel free to steel her style, she is going to be a fashion icon one day. 

Illustration: Lucky cat print.


This print  was drawn for my office (bedroom with desk) space, for no other reason than I like lucky cats. King Kwak bought me the two in the photo, ace aren't they, the big one is a beast.
Lucky cats are Japanese and represent good luck, they can often be found propping up the counters in Chinese takeaways, quite like ourselves.


The illustration has since been used for cards, it is quite versatile and has represented occasions such as new jobs and new homes.


Artwork copyright of Queen Kwak.

DIY: School queen bee child bag.


So following on from the post about my little chaps bag, at the same time I also made my little lady a bag as she was starting pre-school. I wanted a bag she could wear and decided on a rucksack as they are super cute on little ones, and again I probably should have gone to the shop, but fun and cheap overtook me again. And sticking with the again's: there was no happily skipping to the haberdashery, instead I looked inside my bag of remnants. You should know my bag of remnants contains a high quantity of animal fabrics, from a previous project, and a lot of felt, faux leather and oilcloth... basically a lot of non hemming fabrics. What can I say, I am lazy. So anyhow after a little rummage she had the choice of a bee, ladybird, lion or dog bag. She went with lion bag. Ace. I drew my idea. Badly. 

Original sketch for the lion bag.


The 'design' is a bit shameful, I can agree with that, more of a doodle in fact and I must have also been thinking of champagne at the time too. Obviously the two: lion bag and champagne go hand in hand.


Just as I was about to crack on with it, she informed me she had changed her mind and wanted a bee bag after all, not a problem, but I did not draw that one, I just went along the same lines as my lion bag idea.

This bag is made up of a combination of cotton, faux leather and felt fabrics. I used faux leather at the bottom as I thought it would be more hard wearing when she threw it on the floor (I am under no delusions) and I already had a bag of the flowers I had previously made for the rug in her bedroom which is as yet, possibly forever unfinished.

The queen bee crown was a last minute idea, I was quite proud of myself for thinking of that, ho ho. I did have to skip to the haberdashery in the end as I did not have the webbing and buckles for the straps or the zip, but that is all I purchased for this project, so very inexpensive indeed.

Front.


Reverse.


The square on the back conceals a square of plastic (from a broken ring binder) as it needed  some sturdiness to support it. Likewise there is a similar piece of plastic in each wing and the antennas have pipe cleaners in them.

Action shot:
No not particularly action packed, I had to bribe her with the TV to get a picture... Getting a 3 year old to smile for a photo is very hard work in my house.

Cost: 2x metres of webbing £1.60, 2x buckles £1 and zip 89p, all else previously owned.
Supplies: Bee striped cotton fabric, various felts, tan faux leather, webbing, plastic buckles, assorted embroidery threads, assorted buttons, old plastic ring binder, 2 x pipe cleaners, fabric glue, cottons, needle, scissors and a pen.
Time taken: This was all hand stitched and took the duration of 4x baby 2 hour nap times and 3x evenings in front of the TV, all in all about 12 hours. Shameful.

I thought I should point out... this bag was made in time for my babies first week at pre-school, which she started on the Wednesday afternoon. I was up till 12am on the Monday night finishing this bag. The Tuesday night I was also up until 12am doing her homework. (I had all summer).

Homework made.


Homework collage created:
The majority of the night spent on this collage, showing her favourite things, she decorated all the pages by the way, I just sorted the photos. 
I then spent the Wednesday night up until 1am making her a costume for the Friday, which was a Roald Dahl honoured charity day.

Costume sewn:

She was Mrs Ladybug from James and the giant peach.
Then finally I was up until 12am on the Thursday night baking cakes and biscuits for a Macmillan charity bake sell at the school on the Friday.

Cakes and biscuits baked.


And this was her first week. I was scared, proper scared of what was to come and proper knackered.

I must point out that 1. I need to clean my decking and 2. It is now approaching the first half term and so far there has been no further costume making, cake baking or homework creating. Phew. 

So have you made a bag for your child you would like to share with me? and have you had any monster school starting marathons like us? Please share your stories.

Sunday 28 October 2012

Illustration: Knitting mums day card.


This card was for my mum on mothers day. She is a bit nifty with a knitting needle and at the time I kept buying knitting patterns and books on ebay and sending them to her to knit my babies some funky wears. She was truly knitting up a storm for us, I was ever so thankful and this card pays homage to that.
She has since had enough of knitting (and my pattern sending) and is in knitting retirement. I have a little list waiting for when her knitting mojo returns... hurry up mum get it back soon.

My mum actually recently spent several weeks knitting lots and lots of teeny little cardigans and hats which she donated to the local hospital for the premature babies. It is quite hard to get premature baby clothes, so that was really such lovely thing of her to do.


Artwork copyright of Queen Kwak.

Illustration: New born shoes nursery print.


My cousin had a little boy a couple of weeks ago, and this is the print I drew for his new nursery, I hope they liked it. I think I may make one for my little chap, these were his first ever shoes after all. (Pristine don't you think? that will because he wore them 3 whole times before he outgrew them. Dammit)

And for the eagle eyed, I was not told the correct name in the above photo so below is the updated version.


Artwork copyright of Queen Kwak.


DIY Tutorial: Toy animal wall hooks.


During one session of obsessive blog perusing, I saw this link: Pack rack and instantly LOVE, LOVE, LOVED them, it became imperative that I made them. It took a little while to find the right animals, some too small, some too weak and whilst I am all for being cheap, the cheap animals weren't cutting it. (literally). So anyhow off to the early learning centre I trotted and picked up these beauties: Animals. I did wait until they had a promotion week going on and bought them very heavily discounted.


Dead wood.


The wood was from an old discarded pallet found on the street. We cut one end, sanded it, oiled it with mineral oil and then drilled 6 holes at even spaces.

Drill each animal.


We are missing the shots of the animals being cut, which is because we cheated and King Kwak got them cut at work on the band saw. However they are just plastic and could easily be sliced with a hand saw or jig saw, but please do so carefully.

Screw each animal into place.


Pop screws through each hole in the wood then simply twist each animal into place. We put a dot of no more nails on the back of each animal, to provide extra support.

Once all the animals were in place, we added four small silver brackets onto each corner with small screws, then attached it to the wall. Simples.

Casually hanging about.


Action shot:


So I would like to say I have some carefully chosen minimal wares dangling from the hooks, but I don't. And indeed as you can see above, they have in fact become the dumping ground of baby converse from days gone past. I have to put these shoes somewhere, they can't possibly be thrown away.

Cost: Animals, currently £12.50. All else, free or previously owned.
Supplies: 6x Animals, a long piece of wood, sand paper, mineral oil, no more nails, 14 screws (6x long for animals, 4x small for attaching brackets, 4x long for fixing to wall), 4 brackets. Drill and saw.
Time taken: We made this in instalments, but all in all I think about 3 hours max.

So any ideas what can be done with all the remaining animals, I have lots? and any better ideas for what I can do with all the old baby converse?