Showing posts with label ROYAL PLAY. Show all posts

Monday, 18 May 2015

Crafty Kwak's: Half term, Koinobori fabric illustration class.


Crafty Kwak's craftiness this half term: Japanese Koinobori cotton wind sock creation class.
A fun filled fabric illustration & making activity, celebrating Japan's children's day.

We will be making this:


I fancied holding a drawing class this month, so as well as creating the Koinobori we will also be working on our illustration skills. YAY!!

But how??:

For those worried about their children's drawing skills, this is how we will go about it... We will be tracing over pre-drawn fish with a HUGE encouragement for the children to go freestyle and create their own fishy details for their own designs. Older children will be welcomed to draw their fishies from scratch all by themselves.

& It is BBIIGGG:


Oh yes, it's taller than my daughter... Perfect to take to the park & fly or leave to flutter in the garden.

& Here are a few pics from the window display...
Shop front:
Under the sea theme:
Close up:

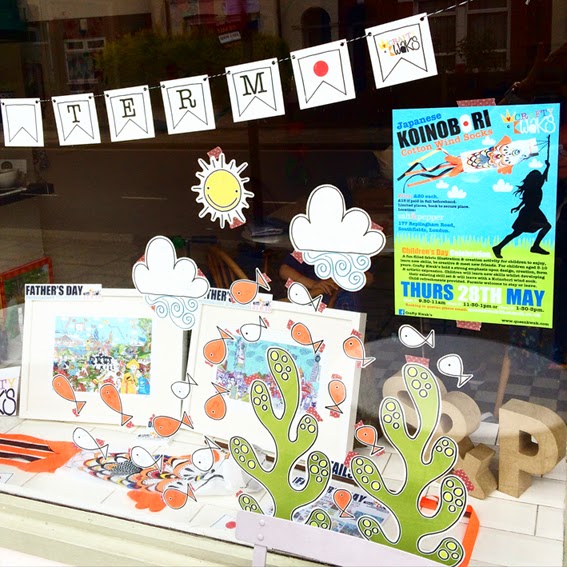
The display also features a Father's day illustration promotion... more on that to follow.

Fishy:
Aerial shot:


The class will be held at Salt&Pepper Southfields, for children aged 3-10 years. Thursday 28th May. Spaces limited, book NOW to secure your child's place... queenkwak@hotmail.co.uk 
I hope to see you there. n.x

Tuesday, 24 February 2015

Rattle drums, dragon puppets, felt flowers and pirate accessories... Half term Craftiness.


We got up to a fair bit of craftiness over half term last week, here are a few pictures of our makes. The week started with two days of Chinese New Year inspired Crafty Kwak's classes. On Monday I held a Year of the goat, rattle drum making class in Southfields and Tuesday saw a Dragon puppet workshop over at Gambado in Chelsea.  

Rattle drums:


A busy day with lots of clever crafters creating rattle drums. The tutorial for the drum can be found over on the website, under the 'Crafty Kwak's' tab.

It looks a little like this:


Chinese Dragons:

The day was bananas and I totally forgot to take pictures, eek, so above is just a couple I snapped before and after.

Gift:

This months goody bags held a crafty little Chinese lantern gift pack to take home and make, I have already heard back from a few parents saying the children really enjoyed them... Hoorah. The lantern tutorial can be found on the website under 'Crafty Kwak's' should you fancy a dabble.

Valentine:

I made a little felt rose for the Mr for Valentines day... Tutorial can again be found on the website, under the 'Crafty Kwak's' tab... check it out.

Pirate fan:


And It's currently all about the pirates in our house so the little lady and myself whipped up a quick felt pirate hat... she made most of this, she's very clever. And that is her most bestest pirate face... Needs a little work. Tutorial will be available soon.

Aaarrrrrrrrr:


And to go with the hat, a pirate must of course have an authentic pirate treasure map. She loved making these, all her own work, apart from the burnt edges. The map is tucked into her belt in the pic above, alongside a very wonky sword. I am pretty sure a sword will be next on the list of pirate makes.

Treasure:


And that was about it, we are all back to school/ work today... time to start planning the Easter class.

Thursday, 19 June 2014

London scavenger Hunt, perfect for the kiddo's.


Well hello, its been a while hasn't it? Life has been KER-azy bananas. Life/ work/ life/ work and so on. I have a bundle of things I would like to share on here and rather than instantly bombarding you with lots of work efforts I thought I would share a little fun day we spent with the babies and their friends. Now this dates back to the Easter hols (I told you its been a while) but it was a fun day and hopefully by the end of this this I will have fathomed how to add a free download onto this, yes thats right free stuff, hoorah!!
So Easter, looking for something fun to do with the littlies, a friend and myself decided to take the little ones on a stroll around London to see some sights. We do in fact live in London, but to be fair we don't really ever (ok never) go and see such sights. So the night before our adventure I whipped up this little scavenger hunt, purely as I thought it might be fun and entertain them. I happened to have a pack of union jack pencils, like you do which was a nice touch, though probably I was the only one who appreciated such things. 

London baby:

I wont lie, this is a shoddy effort of a map. I earnt a living creating plans so I am actually disgusted with myself, but I figure its simple and should be easy to read, and I very well might have made it ever so slightly super quickly. Background map courtesy of Google maps.

So you can see the route we took, it was not that far, and fine for the two three year old's in the party (with buggies for back up) to manage. We began at embankment, headed to Downing street and so on. The entire route took us about 5 hours in total with a lunch break around the Strand. 

On your marks:

Get set, GO. Little lady very eager to start.

Downing Street:

The police guarding the gates were very friendly, chatted away, and posed for photos with the friends (my children were scared). We saw a few cars being searched and we ticked off a few treasures along the way. Happy children.

Horse Guards Parade:

With a stroke of luck we rocked up at the Horse Guards Parade just in time for the changing of the guard. Brilliant, the kiddos LOVED it. Loved the horses, loved the guards, they had a lot of fun.

Say cheeeessseee:

A few poses at the horse guards parade. The boy wasn't up for posing that day.

Backs:

I LOVE this photo, bless them. My son is in blue on the right, and the love of his life/ apple of his eye is standing next to him, he is properly in love. Aged 3.

Trafalgar Square:

Stuck on Nelson.

On guard:

At the Stable yard guards.

Buckingham Palace:

Coo-eeee Queen.

Big Ben:

We passed Big Ben on the route back.

Complete:

And this was my two's completed sheets, even the little one got into it and postboxes/ buses are forever more pointed out on your daily travels.

Free Stuff:

So this is the image you can download, it is at A4, and as you can see there are two hunts per sheet. To download please click here. Please DO NOT download to sell/ make profit from/ take credit for the artwork, this has been purely created as a fun activity by me Queen kwak. I appreciate  the free stuff isn't quite free gold but if it gives one family something to do this summer holidays then I shall be a happy bunny. Happy London hunting all, tell me how your adventures went if you do use the hunt.

All Artwork copyright of Queen Kwak.

Tuesday, 2 July 2013

DIY Play Kitchen.


Here is a little play kitchen I whipped up for the little lady for Christmas 2011. That Christmas, aged three she asked Father Christmas for a little kitchen, like her friend Imogen owned. Now have you seen how much play kitchens are?? Shocking. I was going to settle on this Ikea number and pimp it up, as it was the cheapest of the bunch, but at £90, I just could not inflict such prices upon poor old Santa. So after a little Google inspiration, I decided to make one myself, like you do 5 days prior to Christmas, with at that point very limited making skills plus with an 11 month old who did not ever sleep, seriously NEVER. Not the most genius of ideas this close to Christmas, let's just say we didn't get much sleep that week, but it was worth it. So the following is the kitchen I (OK we) whipped up and how it was made, it sits slap bang in the middle of our real life, fully functional kitchen and I think it is played with pretty much every single day, by the little lady and now the little chap too. I never took photos before, and these were taken yesterday, I think it is in pretty good nick considering it is a year and a half old, and I made it, go me. Woop.

Bookshelf.

The kitchen was made using this bookshelf from Argos. We had owned this for many a year and it had been sitting waiting to be driven to the local charity furniture shop, so it was a no brainer really to use it.

Rejig it.

The shelves required a spot of cutting/ inserting/ general rejiggery, hopefully the image makes sense. This is where King Kwak came in, sawing it by hand in the garden in the cold at midnight, our neighbours must of loved us that week. It was too tall so the top shelf came off, the back plate shifted down. Two shelves removed, and using one of these shelves we cut it and slotted two pieces in below to separate the spaces. Original image courtesy of Argos.

Worktop. 
This is a piece of MDF, cut and sanded. The hole was cut using a jigsaw to fit the trendy stainless steel sink, aka a lunchbox off of Poundland. The MDF was covered in wood grain sticky back plastic (true Blue Peter stylee) £5 from Wilkinson, and I screwed on four knobs, which were 50p at the time from Ikea. The eagle eyed among you may have noticed the sever lack of a tap. First thing the little lady spotted on Christmas morning dammit, but at the time to buy a tap would have cost the same price as the whole thing so I put it on my list of things to do in the future, which needless to say may never happen. She hasn't mentioned it since. The whole piece was then screwed into place.

Paint it. 


The paint was a grey Dulux shade, leftover from my bedroom. Once painted I attached 8 screw hooks to the underside of the top shelf, to hold all of the cooking utensils and pans.

Reverse. 


The bookshelf had no back. We got a piece of hardboard, cut and lightly sanded it. I glued wallpaper on, using wallpaper paste. The wallpaper is leftovers again, from the little ladies bedroom. I attached a layer of transparent sticky back plastic over the wallpaper so it would last and nailed the whole thing onto the back of the bookshelf. The frame was from Ikea, I photoshopped up a little Koco's Kitchen image, and attached the whole frame to the back hardboard, that frame, he is never coming off.

The Doors. 


This kitchen is ultra modern and houses an oven plus a microwave, luxury. The doors were cut from the same hardboard as the reverse, lightly sanded and painted. Transparent perspex was attached behind using No more nails. The handles are from Ikea, £3 for the two, and the doors were hung using little silver hinges.

Perspex. 


You will have spotted we have a bit of custom Perspex laser printing going on. This came free courtesy of Kings Kwak's mate. If you don't have a mate with similar tools this would I guess cost a fair bit, but a similar effect could be created using MDF and paint. The Perspex we have is for the hobs: black and red discs with hob like lines and 'Kocos hob' laser printed on. Further perspex is on the oven and microwave doors, with relevant: dials, buttons, timers and again my daughters name printed upon. My husband did this as a surprise, which was a lovely touch.

Sides. 

To utilise every square millimetre of the bookshelf, the sides feature upon the left: A blackboard menu to display the days culinary delights. And to the right: I popped on some sticky chrome effect hooks, about £2 from Homebase for 2, which store all the essential cleaning apparatus a girl could need. Super handy for my little chap now as he has developed a little cleaning OCD, which is marvellous for me, bless him.

Sewing. 

Now this is what took the time, had me up till silly hours and gave me a sore thumb. First I moseyed on down to John Lewis to buy the fabrics, the floral came first with the others picked to match. I bought the fabrics in 25cm lengths, plus a few buttons and I already owned the ric rac and ribbon. All together the fabric supplies only cost about £10. First I made a little tiered frilled curtain to cover the cupboards, I attached pom pom trim to the bottom of the layers and it is held on using ric rac. Then I made the above for the little lady to wear and use whilst playing. King Kwak's aunt crocheted the dishcloth and I made the bunting out of all the scraps, plus ric rac and buttons and attached the finished piece to the top shelf.

Cupboards:

The little tiered curtain conceals the cupboard space, which stores her crockery/ kitchen supplies.

Cooking.

A close up of inside the oven and microwave. There is a proper authentic oven tray, off of some mango packaging, and the microwave has a actual rotating plate, which was the lid from the sink/ lunchbox, nailed into place.

Top Chef:


She loves it as you can see, she is looking ever so lovely and getting much better at this camera posing I feel.

On the Menu:

And this is what she was cooking up yesterday, some sushi which has to be the best play set they have ever been given. Toy sushi, amazing.


Cost: All in all this play kitchen cost roughly £28.
Supplies: Lots, all mentioned above.
Time taken: Several hours, at a guess I would say roughly 14 hours. Maybe more.

So the £28 price tag is a huge difference to the £90 Ikea play kitchen, granted it took a while and it does not make kitchen cooking noises, but maybe that is something I could look into, or I could make such noises myself every time she plays with it? We were very happy with the results and most importantly the little lady really does love it so it was all worthwhile. Just to point out, the cooking utensils and all other accessories do not feature within the £28, they have all been collected since, mostly as presents for the different occasions since. 

So what do you think? I hope you like it, any comments/ suggestions would be greatly received. Have you made a play kitchen? If you had been planning to buy one, then I definitely would recommend giving it a try.

Thursday, 20 June 2013

Life: Abuji/ Father's day Treasure Hunt fun.


This past Sunday was Fathers day, or Abuji's day, as it is known in our household. (That's Korean for Dad which you probably guessed). And so what does any doting daughter/ darling wife do on such a day? Why yes exactly that, they go away for the weekend with their friends, with not a dad or dad of their children in sight. Go me. In my defence, I never go away, tragically I never get to go out too much either. Boo. This trip had been arranged since last year, and I only realised two weeks ago that the weekends clashed and I felt really rather rubbish, so in my absence I decided to whip up this little treasure hunt so my babies and their daddy could have themselves some Abuji day fun. And fun they did have indeed. Here is how I went about planning our Abuji day treasure hunt.

Cards:


First we made lots and lots of cards, these were made by the babies at home and in nursery.

More Cards:

And then another card was made by my good self. That is a detachable felt rosette that I whipped (sewed and glued) up for the occasion, for Abuji to wear all day.

Banners:

Two little Abuji banners were cut out to hang up.

T-shirts:

And two little T-shirts had Abuji stencilled upon for our babies to wear for the day. The banner of the left in the photo above was actually the stencil for the T-shirts. I bought the T-shirts at Primark, £1.50 each and used some Dylon fabric paint I already owned.

Crown:

This crown, fit for a King Kwak, was sewn for the occasion, using felt, Dalmatian like fake fur and embroidery thread I already had to hand.

Book:

This is where I thought I should purchase a gift he may not put to one side after five minutes, so I hunted down a book I thought he may like. He likes it very much, so that is jolly good.

Map:

Once the treasures were gathered, I sat and pondered hiding places in our home for a very good while. Once decided I set about drawing a little treasure map for the occasion. It was very quick, but well they found the gifts easily so I figure it served its purpose well. The little lady had the responsible job of hiding the map until the Sunday, which she did very well.

Hide and Seek:

The treasures were packed into envelopes and wrapped and were hidden in pretty tricky places. If you can see the map clearly enough above, you can spot this lion print in clue number one, that's the little chaps room, I believe I may have mentioned my frame obsession once or twice?! I also made them keep alternating floors on each clue just to make it more fun (and ever so slightly annoying for Abuji).

Star Prize:

Any official treasure hunt has to have a star prize and ours was... Abuji's favourite beer, what a good wife/ mummy I am. I am quite surprised he did not guess what we were up to as the night the treasure was hidden, my little lady greeted her Abuji at the door from work with "We hid you some beer today, but I am not allowed to tell you that". Miraculously the little chap was dive-bombing onto him at that very moment and he did not hear. 

I have been told the treasure hunt went down very well with all and I got good mummy/ wife points despite my absence. The little lady spent the rest of the day hiding things in the same spots and making them hunt them down, they had a very nice day indeed. I too had a super amazing Abuji's day (aka weekend away with my friends), in case you were wondering.

So have you organised a treasure hunt? How did it go? Happy belated Fathers day to my babies Abuji, my Dad and any daddies who may read this, chin chin to you all.