Sunday, 15 September 2013
Illustration: TDAC Seaweed rice illustrated recipe.
Here is a little something I have been working on over the summer holidays in honour of my little lady. A little illustrated recipe of the very first food she ate and what is still to this day her absolute most favourite food ever, Seaweed rice. I have sent it to the website They Draw and Cook, a brilliant site filled with lovely illustrated recipes (check it out, there is some amazing stuff). I hope they like it enough to add it to the site, fingers crossed on that, but here is the recipe illustration, a recipe I created myself, though I am not too sure if that is something to be too proud of, it is pretty easy plus a bit gloopy, but the little lady LOVES it.
Recipe Illustration:
The entire piece.
To the left:
So you can see it in a little more detail.
And to the right:
A bit more detail for you.
Gloopy:
So this is what it really looks like. Serve gloopy, in a porridge like consistency. And its not just for the babies, King Kwak has been known to often enjoy a bowl, though admittedly it is not really my cup of tea.
First sampling:
The little ladies first sampling of the wondrous stuff. She is just too cute in these two photos, it makes my heart ache. She is 6 months, we were on holiday in Jeju Island, a little island off of Korea, and the restaurant brought her a bowl. Having only had powdered rice/ porridge and fruit until that point, we figured why not and that was the beginning of her love. My recipe is my interpretation of what was served that day. No idea if it tasted similar, purely based on appearance only I'm afraid.
Nom nom:
Still going strong, here she is about a year ago properly devouring it. Look how overjoyed the doll behind her is, proper wooping and air punching... Go seaweed rice!!
I will keep you posted if it is included on the website.
Artwork copyright of Queen Kwak.
Friday, 30 August 2013
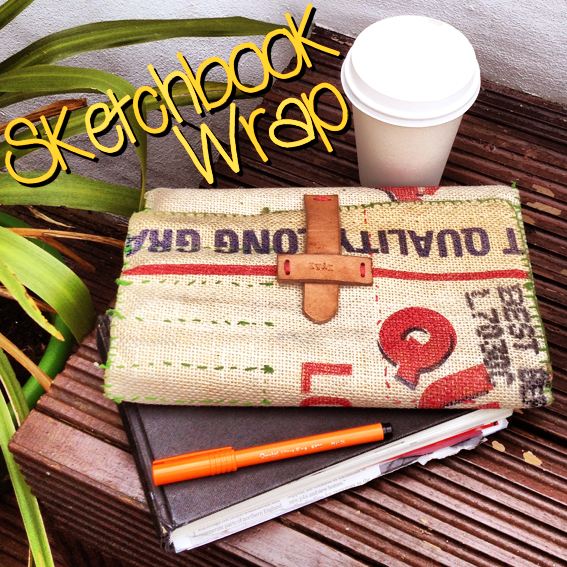
DIY: Sketchbook and Pen Travel Wrap.
First off apologies for the absence, we had ourselves a little holiday down in the Devon and Cornwall counties... two whole weeks off, absolutely lovely. So back to it, I thought I would post a non illustration related post, things have gotten a bit illustration based around here what with setting up the company and website, so here is a little DIY I recently made. Righty ho I believe I may have mentioned King Kwak draws once or twice? He carries a sketchbook and pens around with him all the time, to sketch when the mood take him, all of which rattling around in his bag. He often draws upon the tube to work and home, so for one recent special occasion I decided to make him this little wrap to carry all of his supplies in one easy place. About a year ago my dad had given me a load of old rice sacks, and my husband he is rice's number one fan, so it was a no brainer that I used one of these sacks. I did not photograph the process I am afraid as it was a bit spontaneous one nap time. You can see from the photos how simple it is, but effectively it has been made from one piece of sacking and felt sewn together then wrapped. The length of which equals two times the width of the sketchbook, by just over the length of the sketchbook.
Front:
Sacking outer with leather fastening, I like that the use by date is still upon it. Please excuse the dodgy stitching.
Reverse:
The sacking was cut according to the print upon it, I wanted the rice text to be the focus upon the back.
Fastening:
I made this little fastening from leather, hole punched and sewn on with a nice little punched name detail. I acquired a great little set of steel alphabet and number punches from my dad, similar to which are available on eBay. It is best to do this part outside, as I unfortunately discovered it goes through the leather and my wooden floor now has Kwak imprinted upon it. Oops.
Inside:
A pocket for the sketchbook to the left and to the right I sewed in two little pockets with embroidery thread. One smaller pocket of felt to hold little bits like rubbers, pencil leads, tape... etc. And below a more heavy weight pocket from the sacking, I chose a piece from a nicer part of the graphic and sewed (very basic) lines to hold the individual pens and pencils.
Bits and Bobs:
As you can see the wrap has been aligned to safely hold the sketchbook to the left, the little pockets are able to hold all the supplies King Kwak may need.
Sketchy Kwak:
And should he fancy drawing a heart any time, then now he can do it. No more rummaging around looking for pens. Ok I admit I drew the heart.
Anytime, Anywhere:
And there you have it, he carries it around in his bag all the time and can whip out his sketchbook whenever he fancies drawings something. Job done and an actual miracle I made something for him which he actually uses... Hoorah. On a side note, I spent really rather far too long stamping out bird poo from this photo of the park bench, lovely.
Cost: Nothing.
Supplies: Sacking, felt, leather, embroidery thread, embroidery needle, scissors, leather hole punch, scalpel and alphabet punch with hammer.
Front:
Sacking outer with leather fastening, I like that the use by date is still upon it. Please excuse the dodgy stitching.
Reverse:
The sacking was cut according to the print upon it, I wanted the rice text to be the focus upon the back.
Fastening:
I made this little fastening from leather, hole punched and sewn on with a nice little punched name detail. I acquired a great little set of steel alphabet and number punches from my dad, similar to which are available on eBay. It is best to do this part outside, as I unfortunately discovered it goes through the leather and my wooden floor now has Kwak imprinted upon it. Oops.
Inside:
A pocket for the sketchbook to the left and to the right I sewed in two little pockets with embroidery thread. One smaller pocket of felt to hold little bits like rubbers, pencil leads, tape... etc. And below a more heavy weight pocket from the sacking, I chose a piece from a nicer part of the graphic and sewed (very basic) lines to hold the individual pens and pencils.
Bits and Bobs:
As you can see the wrap has been aligned to safely hold the sketchbook to the left, the little pockets are able to hold all the supplies King Kwak may need.
Sketchy Kwak:
And should he fancy drawing a heart any time, then now he can do it. No more rummaging around looking for pens. Ok I admit I drew the heart.
Anytime, Anywhere:
And there you have it, he carries it around in his bag all the time and can whip out his sketchbook whenever he fancies drawings something. Job done and an actual miracle I made something for him which he actually uses... Hoorah. On a side note, I spent really rather far too long stamping out bird poo from this photo of the park bench, lovely.
Cost: Nothing.
Supplies: Sacking, felt, leather, embroidery thread, embroidery needle, scissors, leather hole punch, scalpel and alphabet punch with hammer.
Time taken: Two hours: One baby nap time.
I do hope that basic description and the photos make sense? Should anyone want a real tutorial, then please send me an email and I shall whip up something for you. I hope you like it, so for any sketchers out there, would you carry this around? And should you see my husband using this on the tube then do say hello.
Friday, 9 August 2013
Illustration: Competition Shortlists.
So in the past week I have made not one, but TWO shortlists... can I have a woop, woop. The latest Is with the above card illustration for a competition held by one of the greeting card giants, Hallmark. The brief was to doodle a birthday/ celebration greeting card. So what better for a party than the obligatory party favourite... the humble party ring. I realise if you are not English you may not be familiar with these biscuits, as I discovered when one King Kwak asked why I had drawn doughnuts and was found muttering words along the lines of "I Don't get it??". Charming. They are biscuits and they feature rather highly at all children parties here in the UK, well the parties I went to as a child at least. Here is the shortlist the colours of my entry have gone a little crazy on their website, fingers crossed it is being judged upon the true colours. Even if I make it no further I am overjoyed to feature in the final six, woo hoo. Here are the four other entries I submitted. The above I drew specifically for this competition, the others are cards I had previously illustrated, which fitted the brief.
Birthday Cupcake:
Birthday Trifle:
Birthday Sausage roll: Why not?
Birthday Jack in the box:
Last week I was also on another shortlist for a Tigerprint competition. The brief was to design a love/ wedding/ marriage themed surface pattern. I chose to illustrate lace as lace and lace trim have featured widely in weddings for many a year and date back to at least 1840, at the wedding of Queen Victoria and Prince Albert. Lace has featured at many a wedding in dresses, accessories and decoration ever since. I did my research, can you tell? This time I was one of 30 with this lace trim illustration. Here is the shortlist, alas I did not win, but I am super overjoyed to be on the shortlist.
Lace trim Surface Pattern:
I did a couple versions along the same theme, and the above lace trim design was accompanied by the lace fabric design below. I prefer the below design to be honest. I am really enjoying designing surface pattern and have many more idea's which I am working on. I hope you like these designs, if you have any comments or suggestions about any of these designs, please feel free to let me know. Have a super weekend.
Lace Surface Pattern:
Artwork copyright of Queen Kwak.
Monday, 5 August 2013
Illustration: 'Feel Good Drinks' poster competition.
Last week was mostly spent illustrating a poster for a competition for 'Feel Good Drinks'. The brief read: "People need to know our brand name, what our drinks look like and that our drinks are full of tasty goodness". The image above is what I came up with. I worked on the theme of goodness and meditation as used within their logo, and more specifically I based my design upon Buddhist meditation imagery. If you like my image and are looking for ways to fill a whole 30 seconds, then please could you be ever so kind and vote for me HERE and I shall forever more be eternally grateful to you for your kindness. All you need to do is open THIS LINK, then press the like button above the image. Thank you ever so, that would be super kind of you. I do not know anywhere near as many people as some of the images have votes, but I worked very hard on this illustration, so it has got to be worth a pop trying to amass the votes at least. Thank you lots and lots and lots, big kisses to you all.
And Here's the link again just in case you missed it. Should you wish to read the full brief that can be found just here. Thank you!!
Sunday, 28 July 2013
I have a website: www.queenkwak.com
At long last, very, very long last, cue drum roll, I am pleased to announce, cue fan fair... I have only finally gone and built myself a website. Hoorah. Cue angels singing Hallelujah, hoorah again. As you maybe able to tell I am a little bit pleased about this. Now if you have come across this blog via my Facebook page then you have probably seen it, but in case you haven't or just wanted to know what it was about then please do read on. So my website www.queenkwak.com has been live for 2 weeks now, I built it myself over a month, the majority of the building within the first week and the remainder drawing new work or updating old work to add to it. I had me a little afternoon of basic tuition, thanking you kindly Mr Sam, who showed me the ropes and then I cracked on from there. The following images are the pages from my site with a brief description. It is a pretty simple website I admit, but I am happy with it.
Homepage:
About:
Brief description about me and what I do, all upon a royal scroll, naturally.
Illustration:
Green Umbrella Charity:
Personalised Prints:
This category houses a selection of personalised prints I have illustrated, mostly for private commissions. This selection includes, wedding congratulations, nursery name prints, personalised pet illustrations (this was a real commission and Doug is the pug's real name, Genius), an engagement story, personalised Las Vegas signage and a couple of prints which have featured on the blog before. All of these prints are available now to be fully personalised and I am happy to undertake commissions if you have a different subject matter you would like me to illustrate. queenkwak@hotmail.co.uk
Cards:
I started out wanting to illustrate cards, I have bucket loads of them, this is just the amount I can put on here. I have covered all sorts of topics and occasions and all are available to be fully personalised.
Invitations:
Crafty Kwak:
Photos of all the bits and bobs I have made. Most of these products have already featured upon the blog, the rest will be explained in future posts.
Architectural Illustration:
This is what I did in my former life, I absolutely loved my job. I established and managed the architectural illustration department in a world famous architectural firm where I got to draw the most amazing buildings and work on the most exciting projects. This is a selection of work I produced for the company during the ten years I spent there.
Contact:
What better than a royal fan fair to announce how to contact me.
Shop:
The shop will be coming soon, fingers crossed it shouldn't be too long now. In the mean time I am happy to take commissions and sell images (exactly like it says on the screen grab, so I shall stop repeating myself) Just email me on queenkwak@hotmail.co.uk.
So that is the Queen Kwak website. New work will be added to the website regularly, so please keep an eye out if you are interested. If anyone is thinking to build a website, I highly recommend doing it. I have been wanting to build one for at least two years, if not longer and always thought it was out of my league, far beyond my capacity, but I did it. Admittedly mine is not full of funky features, it is pretty basic and simple but what I have made is perfect for me now and well I did it myself. Go me, big fat pats on the back for getting off my bum and doing it I think. The moral of my rambling is, if you are thinking of making one yourself and thinking you cant, then in the words of Mr Nike... just do it. Go on, you know you want to.
Now next job on the list is to get me some of those custom icons/ buttons that the clever people have on their blogs/ website's, I want some just to the left of what you are looking at now, wouldn't that be just grand. Now does anyone have any clue how I go about adding them?? (if you are reading this in the future and I have those buttons here then I am clearly one of those clever people now, yay. If I have not got them then that will be a boo and I am obviously a failure. Big fat boo). I really hope you like the website, any comments/ recommendations would be very much welcome. Thank you.
Saturday, 20 July 2013
Illustration: Global Talent Search submission.
Artwork copyright of Queen Kwak.
Tuesday, 2 July 2013
DIY Play Kitchen.
Here is a little play kitchen I whipped up for the little lady for Christmas 2011. That Christmas, aged three she asked Father Christmas for a little kitchen, like her friend Imogen owned. Now have you seen how much play kitchens are?? Shocking. I was going to settle on this Ikea number and pimp it up, as it was the cheapest of the bunch, but at £90, I just could not inflict such prices upon poor old Santa. So after a little Google inspiration, I decided to make one myself, like you do 5 days prior to Christmas, with at that point very limited making skills plus with an 11 month old who did not ever sleep, seriously NEVER. Not the most genius of ideas this close to Christmas, let's just say we didn't get much sleep that week, but it was worth it. So the following is the kitchen I (OK we) whipped up and how it was made, it sits slap bang in the middle of our real life, fully functional kitchen and I think it is played with pretty much every single day, by the little lady and now the little chap too. I never took photos before, and these were taken yesterday, I think it is in pretty good nick considering it is a year and a half old, and I made it, go me. Woop.
Bookshelf.
The kitchen was made using this bookshelf from Argos. We had owned this for many a year and it had been sitting waiting to be driven to the local charity furniture shop, so it was a no brainer really to use it.
Rejig it.
The shelves required a spot of cutting/ inserting/ general rejiggery, hopefully the image makes sense. This is where King Kwak came in, sawing it by hand in the garden in the cold at midnight, our neighbours must of loved us that week. It was too tall so the top shelf came off, the back plate shifted down. Two shelves removed, and using one of these shelves we cut it and slotted two pieces in below to separate the spaces. Original image courtesy of Argos.
Worktop.
This is a piece of MDF, cut and sanded. The hole was cut using a jigsaw to fit the trendy stainless steel sink, aka a lunchbox off of Poundland. The MDF was covered in wood grain sticky back plastic (true Blue Peter stylee) £5 from Wilkinson, and I screwed on four knobs, which were 50p at the time from Ikea. The eagle eyed among you may have noticed the sever lack of a tap. First thing the little lady spotted on Christmas morning dammit, but at the time to buy a tap would have cost the same price as the whole thing so I put it on my list of things to do in the future, which needless to say may never happen. She hasn't mentioned it since. The whole piece was then screwed into place.Paint it.
The paint was a grey Dulux shade, leftover from my bedroom. Once painted I attached 8 screw hooks to the underside of the top shelf, to hold all of the cooking utensils and pans.
Reverse.
The bookshelf had no back. We got a piece of hardboard, cut and lightly sanded it. I glued wallpaper on, using wallpaper paste. The wallpaper is leftovers again, from the little ladies bedroom. I attached a layer of transparent sticky back plastic over the wallpaper so it would last and nailed the whole thing onto the back of the bookshelf. The frame was from Ikea, I photoshopped up a little Koco's Kitchen image, and attached the whole frame to the back hardboard, that frame, he is never coming off.
The Doors.
This kitchen is ultra modern and houses an oven plus a microwave, luxury. The doors were cut from the same hardboard as the reverse, lightly sanded and painted. Transparent perspex was attached behind using No more nails. The handles are from Ikea, £3 for the two, and the doors were hung using little silver hinges.
You will have spotted we have a bit of custom Perspex laser printing going on. This came free courtesy of Kings Kwak's mate. If you don't have a mate with similar tools this would I guess cost a fair bit, but a similar effect could be created using MDF and paint. The Perspex we have is for the hobs: black and red discs with hob like lines and 'Kocos hob' laser printed on. Further perspex is on the oven and microwave doors, with relevant: dials, buttons, timers and again my daughters name printed upon. My husband did this as a surprise, which was a lovely touch.
Sides.

To utilise every square millimetre of the bookshelf, the sides feature upon the left: A blackboard menu to display the days culinary delights. And to the right: I popped on some sticky chrome effect hooks, about £2 from Homebase for 2, which store all the essential cleaning apparatus a girl could need. Super handy for my little chap now as he has developed a little cleaning OCD, which is marvellous for me, bless him.
Sewing.

Now this is what took the time, had me up till silly hours and gave me a sore thumb. First I moseyed on down to John Lewis to buy the fabrics, the floral came first with the others picked to match. I bought the fabrics in 25cm lengths, plus a few buttons and I already owned the ric rac and ribbon. All together the fabric supplies only cost about £10. First I made a little tiered frilled curtain to cover the cupboards, I attached pom pom trim to the bottom of the layers and it is held on using ric rac. Then I made the above for the little lady to wear and use whilst playing. King Kwak's aunt crocheted the dishcloth and I made the bunting out of all the scraps, plus ric rac and buttons and attached the finished piece to the top shelf.
Cupboards:
The little tiered curtain conceals the cupboard space, which stores her crockery/ kitchen supplies.
Cooking.
A close up of inside the oven and microwave. There is a proper authentic oven tray, off of some mango packaging, and the microwave has a actual rotating plate, which was the lid from the sink/ lunchbox, nailed into place.
Top Chef:
She loves it as you can see, she is looking ever so lovely and getting much better at this camera posing I feel.
On the Menu:
And this is what she was cooking up yesterday, some sushi which has to be the best play set they have ever been given. Toy sushi, amazing.
Cost: All in all this play kitchen cost roughly £28.
Supplies: Lots, all mentioned above.
Time taken: Several hours, at a guess I would say roughly 14 hours. Maybe more.
So what do you think? I hope you like it, any comments/ suggestions would be greatly received. Have you made a play kitchen? If you had been planning to buy one, then I definitely would recommend giving it a try.
Subscribe to:
Posts (Atom)